A Brief Review of Adobe Photoshop CS
I recently upgraded to Adobe Photoshop CS (version 8.0) from version 6.0. I didn't think v7.0 was a worthwhile upgrade; my only exposure to that version is the excellent book Real World Adobe Photoshop 7.0.
In short, I'm very impressed with what CS offers. The most-touted features--live histogram palette, more 16-bit file support, and Camera Raw--make an indispensable tool even more flexible and easier to work with.
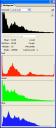
Having the live histogram palette open tells me a lot about the image as I'm editing. Constantly havint to reopen the Histogram in 6.0 was awful repetitive, espeically since there was no keystroke associated with it. I always liked to use Levels a little more than Curves primarily because of the luminosity histogram that Levels provides, but that's not a restriction now. Being able to switch between Compact, Expanded, and All Channels views (shown at right) provides several good ways to view the data.
More 16-bit support is probably the big reason I wanted the upgrade. I scan everything in 16-bit, convert camera raw images to 16-bit, and often upconvert camera .jpg files to 16-bit when preparing for printing.
What's "16-bit," why care? A normal image has three channels with 8-bits per channel, totaling for a 24-bit image--that's the normal .jpg image you get from a digital camera, for example. An 8-bit image has 256 levels of tone in each channel (256 shades of red, 256 shades of green, and 256 shades of blue). Start editing the image--adjusting contrast, for example--and you're compressing those 256 levels. Adjust the contrast a little, and the image is down to 235 levels of tone; adjust the contrast a lot, and the image is down to 200 levels of tone, for example. At that point, you can probably visibly see the jump from one tone to another--the image doesn't look smooth. A 16-bit image has 32,768 levels of tone to it. With so many levels of tone, it's hard to make enough edits to the image to create a visible jump from one tone to another. So, 16-bit is good; 8-bit is not so good.
Adjustment Layers now work in 16-bit mode, which allows for a lot more flexibility to an editing workflow; in v6.0 I never saw much use for them as they only worked on 8-bit images. More filters work in 16-bit mode, as do custom brushes.
While I haven't played with them enough to make a judgement, Match Color and Shadow/Highlight seem like good tools.

The file browser is awesome. This feature didn't exist in v6.0, and based on what I know of it in v7.0 it was little more than the Open command on steroids. The CS File Browser, though, offers so much more: adjustable/savable Workspace, image Flagging and Ranking tools, and an assortment of automation tools, amongst other things. The tools and palettes to review, change and add metadata are very comprehensive. Perhaps the coolest part, though, is the File Browsers integration with the Camera Raw plugin to quickly apply Camera Raw settings. I'm very amazed at the wealth of options that the File Browser makes available--it's almost as complete an organization tool as Adobe Photoshop Album!
Camera Raw is a hugely powerful tool. I wasn't particularly excited about this feature, as I've been satisfied with the other tools I was using to process Nikon raw (.nef) files (Nikon View and Hamrick Software VueScan), but Camera Raw easily trumps them. Adjusting an image's Exposure, Shadows, and Chromatic Abberation are easy to judge when using the modifier key (alt/option). A live histogram also makes it easier to judge when a setting is just right. The ability to save and apply settings or just subsets of those settings makes processing from similar sources easy.
I'm very impressed!
Share Your Thoughts (