Creating Special Annual Ornaments
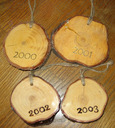
Since our first year as a couple, we have been saving a chunk off the bottom of our Christmas tree stump to make an ornament out of it. Originally I wanted to write special notes on the back of each one such as vacations or events. But, that is now kept in all of the scrapbooks!
Usually when we get home we cut a section off to level the tree in the stand. It's usually about an inch or so thick. We usually take a second cut in case the first one cracks while drying. The cut pieces sit in our closet shelf for many months until we remember to get to them again (usually the time we start preparing for the next Christmas!). When they are completely dried, we sand them.
After the piece is sanded smoothly, I print out the year in a font that I like off the computer. I put the paper on a light box print-side down and shade in the numbers with a pencil. Take the paper and line it up on the wood, pencil-markings down, and color over the printing to transfer the year.
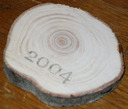
I then use a wood burning tool over my pencil markings. Considering that I only use the tool once a year to do this project, I'm not very good at it, as you can see. After the date is burned in and cool, we apply varnish to help preserve it. At Christmas time we have strung them all together on the wall or just hung them on the current tree. It's our little family tradition!


Share Your Thoughts (