Scanning Slides and Negatives: Comparing Film and Flatbed Scanners

"What kind of scanner should I buy to scan my photos?"
I answer this question fairly often, so created this comparison as solid data to refer to and for others' benefit. Here's the premise: You've got a large archive of photos and want to scan them--what's the best tool? First, if you have the option of scanning a print--4 × 6 or 8 × 10, machine or hand-printed--don't. Always opt for the negative or slide. A negative or slide can contain much, much more detail, contrast and resolution which gives a significantly better scan. A flatbed scanner with transparency adaptor is attractive because a lot of people already have them and/or they're much less expensive than a film scanner. How does the quality compare, though?
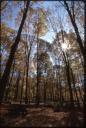
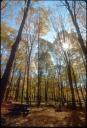
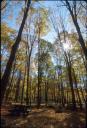
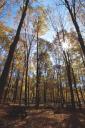
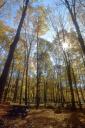
I used the Nikon CoolScan III, Nikon Super CoolScan 4000 ED (both film scanners), Umax PowerLook III and Epson Perfection 1670 (both flatbed) scanners and Hamrick Software VueScan to compare. The Fuji Velvia slide above was the test subject. This slide was chosen for its deep shadows, something most scanners have trouble with. All of these scanners can work with slides or negatives.
Technique
All scans are made at the highest optical resolution the scanner is capable of; I recommend always doing this. If you want a lower-resolution file, downsample the scanned image to fit your requirements. Do a little post-processing before the downsampling--levels adjustment and grain removal, for example--and you'll definitely get better results than just scanning at the desired resolution.
On all scanners this slide was scanned at 64-bit RGBI depth or 48-bit RGB depth, resulting in a 48-bit RGB TIFF file. (64-bit RGBI scans make use of a 16-bit infrared channel for Digital ICE or similar; it's only available on hardware that supports it.) Also known as 16-bit and high-bit depth scans, they hold a lot more information than a 24-bit (also known as 8-bit) scan. The extra information from a high-bit scan minimizes posterization when adjusting levels, for example.
I used Hamrick Software VueScan 8.0.11 with all four scanners. I think it's substantially better software than what is included with the scanners because it's easy to use, very capable, and gives me complete control. It's also worth noting that its ease-of-use and capability makes it easy for a scanning novice to get a good scan; the same interface also allows an experienced scan operator to eek every bit of detail out of a scan. I used Adobe Photoshop to compare the scans.
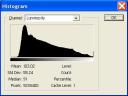
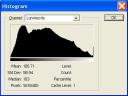
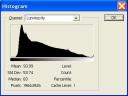
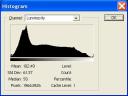
Reviewing the crops below will only tell part of the story. The histogram is an important overview of the information found in each scan. If you're not familiar with a histogram, reading the brief Understanding Histograms at Luminous Landscape will cover the basics.
As the point of this comparison is to see what each scanner is capable of, the following results have received only minor post-processing: levels/curves adjustments to improve contrast (but not throw away any information), reducing the bit depth to a web-friendly 8/24-bit, and converting to the sRGB color space. Color hasn't been adjusted, the scan hasn't been resized, no sharpening has been applied. Raw and adjusted histograms are presented.
Don't Bother Scanning The Print
First, the disclaimer: if all you've got is the print, scan it. It's better than nothing. The point of this article isn't to tell you that you should never scan the print.

I had a 4- × 6-inch print of the test slide made at a local Wal-Mart, plopped it in the Epson Perfection 1670 scanner, and made a scan. The resultant file was 6,364 × 9,326 pixels and 339 MB large--that's 56 megapixels!
Comparing this scan to all of the others made with the slide, you'll immediately see how yellow/orange all of the leaves are. Additionally, the sky--the brightest area on the image--has mostly been blown-out to white. There is very little variation across the sky and other bright areas--+/- 1.5 RGB values (3 RGB values total variation). Compare to the blue sky of any of the below scans and it's obvious the print contained none of that information. Physically comparing to the print, the print does leave the leaves looking too orange and yellow, and the sky does look blown-out; the detail isn't there.
Shadow detail, on the other hand, looks pretty good, showing +/- 4 RGB values (8 RGB values total variation).
The end result is simply that there isn't much information in the print. You can't get a good scan out of it as compared to what you can get from the original slide.
Comparison
The idea behind the comparison is with the intent of archiving the photos on a hard drive, CD or DVD. With that in mind, capturing every bit of detail available is the utmost goal.
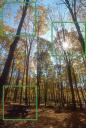
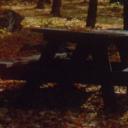
In the thumbnail at the right you can see three outlines. Those outlines represent the cropped area views that are available below at 100%. Since these scanners all have different capabilities, the 100% crop will vary in size.
Because of the very large size of these files, the original scans are not available to download. A small copy of the scan is available, giving an overall feeling to what the adjusted scan looks like.
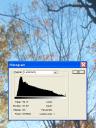
Umax PowerLook III Flatbed Scanner
The Umax PowerLook III flatbed scanner with transparency adaptor is a 1200 × 2400 hardware dpi SCSI-connected professional flatbed scanner introduced in 2001. New its cost was about $700. It has since been replaced by a newer model.
This scan was made at 1200 dpi and 48-bit RGB. The resultant file is 1107 × 1646 pixels (roughly 1.8 megapixels) and 11 megabytes large. Printed at 300 dpi with no interpolation, this yields a 3.69 × 5.49-inch print.
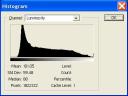
The below edited crops show well-defined thin branches and muddled leaves. Even on the original slide not much detail exists in the picnic table, though using the eye dropper tool at a 5-by-5 average shows +/- 1 RGB value (for a total variation of 2 RGB values) in the Adobe RGB color space--not enough to show any sort of detail. Colors are a little oversaturated.


My experience with this scanner is primarily limited to reflective scans, not transparencies. Reflective scans--prints, for example--are something this scanner is very capable of handling well, and colors are normally pretty neutral. Scanning the slide shows that this scanner has different characteristics with transparencies, however. Firstly obvious is that the scan is a bit oversaturated.
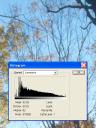
Epson Perfection 1670 Photo Flatbed Scanner
The Epson Perfection 1670 Photo flatbed scanner with transparency adaptor is a 1600 × 3200 hardware dpi USB-connected $100 consumer flatbed scanner introduced in 2003. c|net has a review of it.
This scan was made at 1600 dpi and 48-bit RGB. The resultant file is 1480 × 2187 pixels (roughly 3.2 megapixels) and 19 megabytes large. Printed at 300 dpi with no interpolation, this yields a 4.93 × 7.29-inch print.
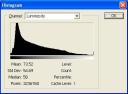
The edited crops below show well-defined thin tree branches. Nothing is very sharp, especially obvious in the picnic table crop. Even on the original slide not much detail exists in the picnic table, though using the eye dropper tool at a 5-by-5 average shows +/- 1.5 RGB values (for a total variation of 3 RGB values) in the Adobe RGB color space--not enough to show any sort of detail.


My experience with this scanner is limited because I haven't had it for long. Most of my experience with it is reflective scans, which this scanner seems very capable of, though color is often slightly undersaturated. In this transparency scan, color is obviously very undersaturated, likely a result of a low-power diffusion light.
Nikon CoolScan III Film Scanner
The Nikon CoolScan III LS-30 is a 2700 dpi SCSI-connected prosumer film scanner from 1998. It has Digital ICE for removing scratches and marks on old film and is capable of multi-pass multi-scanning to pull more detail out of the shadows. Imaging Resource's brief review is still available. This scanner can often be found on eBay for about $100, making it a great deal--new it cost $700. It has since been replaced. by a newer model.
11/22/04 Update: It looks like this scanner is getting popular again because finding one on eBay for less than $250 is a tough chore!
This scan was made at 2700 dpi, 64-bit RGBI, and six passes were made. The resultant file is 3680 × 2505 pixels (roughly 9.2 megapixels) and 54 megabytes. Printed at 300 dpi with no interpolation, this yields an 8.35 × 12.27-inch print.
The below edited crops show excellent detail and sharpness, particularly obvious in the leaves and thin branches. Even on the original slide not much detail exists in the picnic table, though using the eye dropper tool at a 5-by-5 average shows +/- 4 RGB values (for a total variation of 8 RGB values) in the Adobe RGB color space--enough to make up some speckled wood shadow detail.


Extensive experience with this scanner tells me it's very capable of anything I throw at it. Printable shadow detail is captured, color is accurate, and the result is sharp. I've made numerous 11 × 14-inch prints of files from this scanner that have proven just as excellent as traditional darkroom techniques.
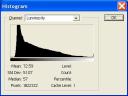
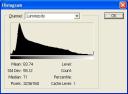
Nikon Super CoolScan 4000 ED Film Scanner
The Nikon Super CoolScan 4000 ED is a 4000 dpi Firewire-connected professional film scanner from 2001, bigger brother and a generation newer than the CoolScan III. It has Digital ICE for removing scratches and marks on old film, Digital GEM to reduce grain, and Digital ROC to restore the color of faded film. In addition to being a single-pass multi-scanner it has a substantially larger dynamic range to capture more shadow detail than the CoolScan III. Imaging Resource's brief review is still available. New its cost was $1400--a steal when you consider that its output is comparable to a $5000 drum scanner like the Imacon Flextight 343. They can be found used for about $600. It has since been replaced by a newer model.
This scan was made at 4000 dpi, 64-bit RGBI, and six passes were made. The resultant file is 3676 × 5389 pixels (roughly 19.8 megapixels) and 116 megabytes large. Printed at 300 dpi with no interpolation, this yields a 12.25 × 17.96-inch print.
The below edited crops show excellent detail, obvious in the thin branches and leaves--just like the CoolScan III. Also obvious is some chromatic abberation present on the slide but not picked up by the other scanners. Lens flare is well defined and evident, not a blob like the results from other scanners. Close examination shows the film grain in the sky and shadowed areas, also not picked up by the other scanners. Picnic table detail consists of +/- 8 RGB values (for a total variation of 16 RGB values) using the eyedropper tool with 5-by-5 averaging. The Super CoolScan 4000 ED's superior capabilities are clearly evident.


As with the CoolScan III, extensive experience with this scanner tells me it's very capable of anything I throw at it. Color is accurate, and the result is sharp. Unprintable shadow detail is captured (unlike the CoolScan III), which can be manipulated into printable shadow detail, improving the result.
4000 dpi scans are both a blessing and curse: the higher resolution scan lets me crop and enlarge more, but it also captures grain in the film. Fuji Velvia (ISO 50) grain can be captured and found in the image pretty easily, but can be satisfactorily removed and doesn't show up when printing. However, higher ISO film--especially ISO 400 and higher--has such dominant grain that it is difficult to remove and is visible on prints. My experience is that the lower resoltuion of the CoolScan III (2700 dpi) isn't capable of capturing the grain but does create a high-enough resolution print for most uses.
Making a 4 × 6 Print
The scanning examples above are fine for archival use. In my opinion, it pretty conclusively shows that the flatbed scanner just isn't that good. But how about for making a regular 4 × 6 print--is the flatbed good enough?
These files have been resized, received levels adjustments and minor color correction, converted to 24-bit and were sharpened--ready to take to Wal-Mart and have a print made.
Umax PowerLook III Flatbed Scanner
Click the thumbnail at the right for a 4 × 6-inch, 289 dpi (1156 × 1734 pixels) 890 kB file. 289 dpi is enough to make a convincing 4 × 6 print, so I see no need to upsample the image--which could further degrade quality.
The edited scan looks pretty good: everything appears sharp and colorful, though dark shadow detail around the picnic table and some trees will print black.
Epson Perfection 1670 Photo Flatbed Scanner

Click the thumbnail at the right for a 4 × 6-inch, 300 dpi (1200 × 1800 pixels) 750 kB file.
The edited scan looks pretty good, similar to the PowerLook III scan: everything appears sharp and colorful, though dark shadow detail around the picnic table and some trees will print black. Overall the image is a little dark. Brightening the image began to cause posterization, so I chose to have a dark image with even tones over a bright image with garish color.
Nikon CoolScan III Film Scanner
Click the thumbnail at the right for a 4 × 6-inch, 300 dpi (1200 × 1800 pixels) 1.2 MB file. Downsampling from the original scan resulted in 4:1 pixel averaging (every 4 pixels from the original scan were averaged into 1 pixel for the 4 × 6 print) creating a much sharper image than the original scan.
As good as the flatbed scans look at 4 × 6, this edited scan is substantially better. First, the image is substantially sharper, though in a physical 4 × 6 print this will probably be less obvious. Color is more subtle and varied. Dark shadow detail is evident; most will probably blow out to black on the print, but a little texture will be evident.
Nikon Super CoolScan 4000 ED Film Scanner

Click the thumbnail at the right for a 4 × 6-inch, 300 dpi (1200 × 1800 pixels) 1.2 MB file. Downsampling from the original scan resulted in nearly 6:1 pixel averaging (every 6 pixels from the original scan were averaged into 1 pixel for the 4 × 6 print) creating a much sharper image than the original scan.
This edited scan is slightly improved over the CoolScan III results and substantially better than either of the flatbed scans. The image is substantially sharper, though in a physical 4 × 6 print this will probably be less obvious. Color is much more subtle and varied and a little more saturated. Dark shadow detail is evident; most will probably blow out to black on the print, but a little texture will be evident.
Conclusion
The archive comparison shows the extremes of what each scanner is (or isn't) capable of by creating a scan ready to be archived--obviously the flatbed scanners fall very far short of what the film scanners are capable of. Both of the tested flatbed scanners are very good at their primary job--scanning reflective media. For that purpose, I've been very happy with what each is capable of. They're just not that great with transparencies.
I could continue the "real world" examples with an 8 × 10-inch print comparison, but I hope it's obvious that the flatbed scanners wouldn't be up to the task. When creating a 4 × 6 print, however, the flatbed scanner appears to be pretty capable. And of course, if you only want a web-quality scan any scanner is probably capable of giving acceptable output.
Given the cheap used prices for the Nikon CoolScan III, I'd hope most opt for one of these over a similarly priced flatbed scanner. It's an excellent scanner, capable of quality results--especially when there aren't deep shadows.
Share Your Thoughts (
Older Comments (18)
Dan & Sherree & Patrick currently uses Facebook for comments. Older comments are still here for readers, though. Read old comments »
I would not disagre with your analysis given the flatbed scanners you tested. However, they are not state of the art in dual use scanners.
If you have a chance to test the Epson 4870 Photo, I think you will draw less clear cut conclusions. My personal reaction to the results of 35mm scans is that a mid range film scanner such as the Coolscan V still gives a slightly better result, but the Epson 4870 is very close, and it can do medium format transparancies.
If I get the opportunity to expand the comparison to some newer scanners, I certainly will.
It's true, the flatbed scanners I used are not the latest and greatest. The chances that anybody today would buy a used Umax PowerLook III are slim to none, and I doubt most who purchase the Epson 1670 are looking to scan film. Flatbeds definitely hold an advantage for larger-format film, though, because of the huge cost difference.
However, the film scanners are not the latest and greatest, either. The CoolScan III is six years old and the CoolScan 4000 is three-plus years old. I'm sure a new film scanner can do even better. Looking at it that way, these old film scanners do better than the newer flatbed scanners I tested.
With that in mind, I can't see a current flatbed performing nearly as well as a current film scanner.
Just wondering if you could consider adding in a comparison to slide/neg copying via a lens adapter into the camera directly. I have made just started to copy some 35mm slides with my coolpix 5400 (with a 3rd party adapter) and the high resolution results look very good to my eye.
However as I have no access to a scanner, it would be nice to see what sort of quality difference there is between scanner & camera copying. Thanks!
Testing a slide copying adapter is a good idea, though I don't have one to work with.
I have tried to use my 5700 to copy slides, but I only experimented briefly. I put the slide on my light box, positioned myself overhead--zooming in and focusing as close as possible--to take the photos. I wasn't impressed with the results for two reasons:
I am interested in getting a Nikon Coolscan V ED Film Scanner.However some scanners will slighter crop the original scan, which makes them useless for my work. Do you know if this is the case with the Nikon V?
Thanks very much for your thought on this,
Len Bernstein
Neither the CoolScan III nor the 4000 crop the scan area in any way. I would bet the V operates the same way, though I have no experience with it.
I have some 1920 film that are large format. Can you suggest a film scanner that will accept the approx 4x5 film negatives
For something that large, I think you'll *have* to go with a flatbed scanner. I don't have any specific recommendations, except to say that you get what you pay for!
Being a novice, and trying to learn as much as possible, I appreciate the time and effort you spent in comparisons. I currently use an Epson 4490 and have been very pleased with it's abilities but the time to scan takes too long. I am considering the Nikon Super Coolscan 5000ED but have read that with some,it locks up their pc after a few scans or the software is cumbersome. I believe, as you showed, that a dedicated film scanner is better than a flatbed, thus I may just bite the bullet and purchase one. Thanks.
Hi I read with interest your comparison on scanners. I have just purchased the Canonscan 4200f. My slides are over 40 years old and have dust on them - does anyone know of any software that will identify the marks as dust and remove it?
For a page called "Scanning Slides and Negatives" this ONLY gives advice on scanning PHOTOs!.
I don't get it. You're looking for info on scanning some film that isn't a photo? Wouldn't the same rules apply?
FIRST, I AM NOT A PROFESSIONAL AT PHOTOGRAPHY. I got about half way down on your explanations and gave up because my mind started going haywire with the unknown info you were explaining. What I have is a Lexmark X8350 mult use printer. I have a lot of color slides that I started taking when I was in the US Army in 1957. I have taken loads of slides over the years but probably stopped about 20 years ago. I used to be able to view them on a projector that I have, but no longer works. It is an Airequipt Superba 77. It is no longer manufactured and the company is out of business. I do not want to purchase another projector. I just want to be able to go through the slides and pick out the ones I want to keep and put them on a DVD. The rest are just scenery pictures that mean nothing to me any longer.
What I don't mind purchasing is an adapter, if there is one available, that I can use in conjunction with my Lexmark printer/scanner.
What do yoy think?
So, really, you want to know the results/conclusion of my scanning comparison without actually reading it? Simply, you should take the time to read through it all and learn the terms I use. Having the correct hardware is only half the story--you need to know how to use it, too, and being familiar with terminology and techniques (as I discuss above) is a great first step.
I can't give a straightforward answer to your question. If you want marginal-quality scans that are good enough for the web or screen use, your scanner will work fine. If you want a good quality scan, you need a film scanner.
How do I get dust & smudges off 30 yr old negatives.
Lesley, try some Pec12 and PecPads.
I have been using a Nikon 9000 coolscan for three years. It is excellent. I would like to upgrade my syatem to 64 bit Viata but can not use the nikon 9000 with it. What is available for 64 bit Viata?
Thanks Dan and the conclusion is simply a fact that flatbed is in no where comparable to film scanner.
Dick: VueScan supports both Vista and Windows 7 64bit version and it is great
« Close old comments