Preparing for the Dayton Hamvention
I'll be at the ARRL Expo at the Dayton Hamvention later this week, running the "QST Cover Photo" booth. This is the first year I'm going, and the first time a booth like this will be there.
I'm getting everything packed up now. Most of the equipment will be leaving today--driven out--and I'll be arriving Thursday morning with the rest of the ARRL contingency to get everything set up.
A little more detail on my booth is here, though the pertinent part is buried:
Never made the cover of the Rolling Stone (or even the local newspaper for that matter)? Visitors dropping by ARRL EXPO 2005 can have their photos taken then digitally superimposed on a cover of QST. For a modest fee, you'll walk away with a souvenir to wow your friends or at least hang on the wall of your shack.
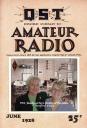
Actually, there are two QST covers you can choose from--June, 1928 and a modified-for-Hamvention May, 2005 cover.
Making this actually happen is more interesting than the final result, in my opinion. Softboxes and a white background let me blow out the background when shooting the subject. A Canon EOS 20D is "tethered" to a computer, so a photo gets saved on the computer rather than on a memory card. The photo is opened in Adobe Photoshop and is resized and receives some minor levels adjustments, then saved and closed. Next, Adobe InDesign opens the cover/background template, the photo is placed, and automatic clipping is used to "cut out" the person from the background. A PDF file is generated and the template is closed (without saving). Finally, the PDF gets printed out, and that's the final product!
Of course, going through all those steps manually would be too time consuming to be efficient, and the monotony would certainly lead to insanity! The process was streamlined with AutoHotKey, a free macro/automation utility. I created a macro for each cover choice. So, to create a print, I run the correct macro, which pops up a dialog asking for a photo file. Select a file and hit ok, then let it do it's thing. The macro steps through all the processes above. After the photo is placed (in InDesign) in approximately the right spot and the clipping is applied, the macro pauses, where I can make whatever adjustment might be necessary to the clipping and position. When I'm sure it's ok (and it usually is), I just click an "ok" button to continue the macro. The macro finishes, a print comes out, and we're ready for the next one. The whole process takes just under one minute.
Taking less than a minute sounds pretty reasonable to me until I start to think about it. I'll be working at the Hamvention for about 1,500 minutes, meaning I can create 1,500 prints. Unfortunately, with more than 25,000 people expected, that's just a tiny percentage. I don't expect everybody to want one, but I'm afraid that demand will far outstrip supply. I do have an assistant, though, and if (when?) I get flooded I'm sure I'll have more help. If nothing else, it should be exciting!
Share Your Thoughts (