Adobe Photoshop’s “Mysterious” Quick Mask Mode
Based on my experience, the most unused and misunderstood feature in Adobe Photoshop has got to be the Quick Mask mode. I've talked to many who click the Quick Mask buttons, see nothing happen, and dismiss the feature as something obtuse they'll never use. Not so! Simply, Quick Mask is a simple but powerful tool to make creating selections easier.
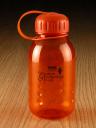
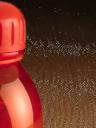
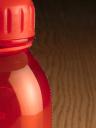
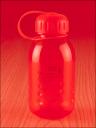
As an example, I'll cut out the bottle from the background, also known as silhouetting. There are several approaches you could take to making this selection, but the most obvious might be to use the Magic Wand or the Lasso. All the texture in the wood makes selecting with the Magic wand something of an arduous process. A steady hand with the Lasso tool works well, but it's tedious and you can easily cause yourself some grief by jumping a few extra pixels. You can see in the examples below that the Magic Wand selection leaves many pixels unselected because of the detail of the wood; the Lasso selection is far from perfect, with several jagged and misselected areas.
There has to be a better way, right? There is! (Actually, there are quite a few better ways to make this selection--using the Quick Mask mode is only one of them.) Using the Quick Mask mode, you can paint your selection into place using all of the painting/drawing tools such as the pencil, paint brush, and gradient tool. Change to the Quick Mask mode by clicking the Quick Mask button in the Tool palette or press "Q." Now you'll begin painting. Use the color black to paint the mask on and white to remove the painted mask. (Use "X" to quickly switch between the two.) Grays can also be used to paint on partial selections, but that's probably a topic a little more advanced than I'm covering here.
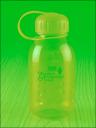
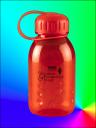
The thing to remember is that you're painting a selection in the Quick Mask mode, and nothing more. My approach is going to be to use the Paint Bucket tool to paint the whole area with the color black. When the Paint Bucket is dropped on the image, you'll see it turn a transparent red, though, not black. This red color shows the selected area. Because the color of the mask and bottle are so similar, I changed the color of the mask. This can be done by double-clicking the Quick Mask mode button and specifying a new color. I picked green. Switch to the color white and remove paint from the bottle area to create the selection. I use a large paint brush to remove the big areas and a small brush to get the edges. Click back to standard mode and you have the selection visible.
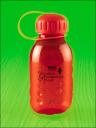

Delete the background and you've got a silhouetted image. Place it on another background to see it float. The problem is that it's obviously not been selected well. Another opportunity to use the Quick Mask mode! Switching back to Quick Mask mode lets me paint in the areas where I've missed or done a poor job. Use a soft brush to make the bottle blend a little, too.

Based on what I've demonstrated, you might think that using the Quick Mask mode takes longer to use than the Lasso or Magic Wand tools--and in this example, you're right. Really, the most efficient way to do this example would be to quickly make a selection with the Lasso or Magic Wand tools, then switch to the Quick Mask mode to clean them up a little. However, when you encounder a complex selection, using the Quick Mask mode from the beginning can often be the best approach. Remember that you can use all the painting tools to make a mask. For example, being able to widely vary the brush size could make painting a detailed selection much easier.
Regardless of the approach, using the Quick Mask mode to clean up a selection will be much easier and faster--and yield better results--than any other method!
Share Your Thoughts (
Older Comments (8)
Dan & Sherree & Patrick currently uses Facebook for comments. Older comments are still here for readers, though. Read old comments »
Hey!
Wow this is the best tutorial for a quick mask mode I've seen on the internet so far!! *clap*
I actually have a question rather than a comment. Quick mask is indeed very useful and i have been using it for years. But now for some reason whenever i use the brush in quick mask mode, its opacity is very low, despite it's 100% value. I find myself having to go over the reddened area with the 'multiply' option to get the area completley selected... any suggestions to how this came to be? Better yet how to fix it?
To toff:
having just the same problem as you describe here I wonder if you have you managed to find the solution?
Thanks in advance to anyone who might give a helpful advice!
toff: just wondering if you found a solution to the low opacity problem in quick mask mode
I had doubt about QM. Last half an hour I searched on the net to understand this QM clearly. So far I got your explanation is the best one.
Appreciate it.
Cheers!
John
Thanks for the explanation :)
To those with the opacity issue: Double click the quick mask button. On the pop-up window it is possible the mask opacity is set at 50% - Hope this helps :)
the opacity issue is due to the fact that quick mask mode uses black and white as it's only "colour" source. Black will add to the area painted and white will take the painted area away(selection and deselection you get the idea I hope.) If your foreground is GREY when you paint while in quick mask it will be be like selecting 50% of the area making the opacity issues you are all having.
Thank you so much! You should be a teacher :P Perhaps you are :)
« Close old comments