Basic Scanning Techniques
Sherree's grandmother recently gave us a few old photos to scan. Most of the photos appear to be from the 1940's to the late 1960's. Some are in good condition, some are not. All are faded and yellowed quite a bit. (The yellow can be difficult to tell, though. "Sepiatoning" was popular before color photography became an option, just to help add some depth to the photo.) They will be a little difficult to scan well.
I saw this as an opportunity to share some basic scanning techniques. Scanners and scanning is becoming less popular as digital cameras become more popular, but it's still the best way to capture an existing photo or other document. The trick is knowing how to use the scanner and its software to do the best job that can be done.
Choosing a Scanner and Software
As few as five years ago, you had to spend some serious money to get a capable scanner--at least $500. In the last few years this has changed dramatically. Now, even a cheap $100 scanner is capable of capturing an amazing amount of information, rivalling what a $500 or even $1,000 scanner can do. If used properly, that is.
To scan these photos I'm using a nearly two-year-old Epson Perfection 1670 flatbed scanner. It's since been replaced by the 3490 model. It costs less than $100, but does a great job. I highly recommend using Hamrick Software's VueScan software to control the scanner. This software works with a wide variety of scanners from different manufacturers but, more importantly, it lets a novice make a great scan and lets an expert pull every last ounce of detail out of a photo. It's easy to use, too. Even though I'm demonstrating with this software, any of these tips can be used in other scanning software (though options may be in different locations and named differently).
Start Off Right
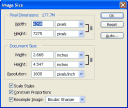
The biggest hurdle you'll need to overcome to get a good scan is that of size and numbers. You're going to create monstrously large files. 100, 300, even 500 MB is possible. Yes, that large. Yes, you need to do it this way.
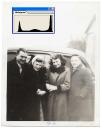
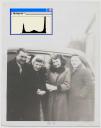
It's pretty simple, really: you want to capture all the detail there is, and that makes a big file. Don't worry, though, after you've scanned and made some basic adjustments you can resample the image down to a more reasonable size. The two photos below compare the "good" way (high-resolution, 16-bit scan) and the "bad" way (low-resolution, 8-bit scan). The "good" photo has been resampled to a lower-resolution and 8-bit, so in the end they're both the same file size--but it's still easy to tell which is which.
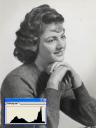
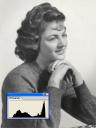
Neither of these photos have received any sharpening. Compare the sharpness of the eyes, lips, hair and sweater cuffs--the "good" scan is clearly sharper. The spikes in the "bad" photo's histogram indicate data compression--something else that destroys difference and detail. Keep reading for more on histograms.
Learn to Read a Histogram
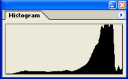
The histogram is a simple-to-use tool if you know how to read it. The histogram shows you what the photo is made up of. On the far right is pure white (RGB values 255, 255, 255) and on the far left is pure black (RGB values 0, 0, 0). Everything in between is the midtones, quartertones, highlights and shadows. The other important thing to know is that a histogram is what it is: it's not necessarily good or bad, it's just showing you the data.
From the histogram at the right we can tell that it's a brighter picture because most of the data is on the right. We can also tell that there aren't many (any?) pure blacks (RGB 0, 0, 0) but there are pure ("clipped") whites (RGB 0, 0, 0).
Furthering the histogram reading, you want your scans and histograms to come as close as possible to each end. This has the effect of maximizing contrast and creating a good scan. If the histogram is scrunched up, you'll have low contrast and create posterization (tonal gaps) when you try to correct it. It's easier to show than explain, though:
The above two images show a good scan and histogram and a bad scan and histogram. It's easy to see how they differ, and it's obvious which one is better. Can the bad scan be fixed in Photoshop? Sure, but the fixed copy won't be as good as a good scan. The below images compare the original good scan to the fixed bad scan.
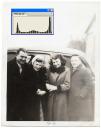
The photo looks pretty similar, but study the histogram. All the gaps between levels is posterization--jumps in tone. There is no detail there, no difference from one pixel to the next. With all those gaps, a lot of detail had to be lost. Why throw all that data away? Just scan it right the first time and you've captured all the detail!
In the end, a good scan is measured by the histogram, not how the photo looks.
Scanning a Photo
Unfortunately, getting a good scan isn't as simple as just pushing a button. (But if you've read this far, you know that!) A lot of work needs to go into it if you want to see a good result.
Default Settings
Every scan should start with the same settings:
- Always scan in color. When the intent is to capture everything in the photo you need to scan in color, never grayscale. In my case, the photos are all black and white, but they've yellowed over the years. I don't know exactly how the yellowing might be interpretted if I ask the scanner to do a grayscale scan--it's almost definitely going to skew the scan a bit. I can always convert to grayscale later, after I've decided exactly what it should look like.
- Use the highest optical resolution your scanner offers. Scanning at the highest resolution always results in a sharper scan than a lower-resolution setting. If you want the resultant file to be a lower resolution, scan at the high-res setting and resample down to a smaller size with your image-editing software.
- Scan at 48 or 64 bits per pixel. A 48/64-bit scan offers about 16,000 levels of tone; a 24-bit scan offers 256. All that extra information will go a long way towards eliminating posterization.
Preparation
Keep fingerprints and other gunk off the photo: use gloves to handle them. Clean the glass bed of the scanner.
Scan!
Preview the scan.
Evaluating how the photo needs to be scanned is the most difficult part. Before evaluating, I reset several of VueScan's settings: color balance to White Balance, black point to 0, white point to 0 and brightness to 0.
Always correct the biggest problem first. If the biggest problem is that the color balance is off, I try a setting other than White Balance first. If the whole photo is too dark or light, I adjust brightness first. Correcting the largest problem first will make it easier to focus on the smaller problems (black and white point in the histogram). That said, VueScan usually gets the color balance and brightness right--I can usually just jump over to the black and white point adjustments.
Black and white point adjustments are quite easy: using the histogram as a guide, adjust black and white so that they're close to the endpoints of the histogram. Be sure to also compare the histogram to what you actually see in the photo, too.
Often, blacks are easy to set. Running my mouse over the photo, VueScan shows me the RGB values of the selected area. Usually, the blackest black is just a deep, deep shadow with some variation. I don't want this area to be pure black (RGB 0, 0, 0), but close.
White is slightly more difficult because of specular highlights. Specular highlights are areas of pure white, where no information exists (RGB values 255, 255, 255). The histogram will show a sharp spike on the far right-hand side to indicate this. No matter how much you adjust the white point, there will still be nothing but pure white there. Specular highlights are not a bad thing, and are going to be found in many photos. The trick is to recognize that you can't affect them, and to get the highlight detail (near-whites) as close to pure white as you can without blowing them out to RGB 255, 255, 255.
VueScan offers Restore Colors and Restore Fading filters. They are both "on or off" options, with no adjustments. I don't use either of them. They're a bit too harsh, in my opinion. I can do better in Photoshop, though not as quickly as this option can.
Scan.
Post-Processing
I'll open the scan in Photoshop and have a look at it to ensure it came out how I wanted. I often have to straighten the scan, though that's easy. If any basic curves or levels adjustments are necessary, I make them now.
If the file is exceptionally large (300+ MB or so) I'll consider resampling the image to a lower resolution. I usually only do this if I've scanned an 8 × 10-inch print. I can't offer any specific recommendation on what to resize to, except that by resizing you're throwing away a significant amount of data. I would never resize to below 1800 × 1200 pixels, which is enough for a 4 × 6-inch print.
To save disk space, I convert the scans from 16-bit to 8-bit mode. 16-bit mode has helped me get a good scan, but now that I have a good scan, the benefit of the extra data is greatly reduced: I'm not likely to make a large levels adjustment and introduce posterization, so I don't really need the 16-bit data anymore; 8-bit is more than enough for the minor adjustments I'll make. This basically cuts the file size in half. This should be the last step before saving.
I always save files in the TIFF format, never JPEG. The JPEG format saves files with a "lossy" compression, which means it throws data away to save space. After going through all this work to get a good scan full of good data, throwing it away sounds like a dumb move to me. The TIFF format offers lossless compression (ZIP or LZW) or no compression options, maintianing all that detail in the scan.
Conclusion
And there you have it, basic scanning techniques to get you a good scan. If you've read through but still aren't convinced, I'll refer you back to the comparison of the "good" and "bad" scans!
Share Your Thoughts (
Older Comments (1)
Dan & Sherree & Patrick currently uses Facebook for comments. Older comments are still here for readers, though. Read old comments »
Excellent information!! writer's email could have been put here.
« Close old comments